As it turns out, an ASP.NET web page can be constructed using one of two approaches, the first of which is to build a single *.aspx file that contains a blend of server-side code and HTML. Using this single-file page model approach, the server-side code is placed within a <script> scope, but the code itself is not script code proper (e.g., VBScript/JavaScript). Rather, the code within a <script> block are written in your .NET language of choice (C#, Visual Basic, etc.).
If you are building a web page that contains very little code (but a good deal of static HTML), a single-file page model may be easier to work with, as you can see the code and the markup in one unified *.aspx file. In addition, placing your procedural code and HTML markup into a single *.aspx file provides a few other advantages:
On the downside, the single file page model can lead to the same problems you had under classic COM-based ASP: a single file that is doing too much (defining UI markup and programming logic in one place). Nevertheless, you’ll begin your journey of ASP.NET by examining the single-file page model.
Your goal is to build an *.aspx file that displays the Inventory table of the AutoLot database (created in Chapter 21) using the connected layer (but, as you would guess, you could also use the disconnected layer or the Entity Framework). To begin, launch Visual Studio 2010 and create a new Web Form using the File > New > File menu option (see Figure 32-8).
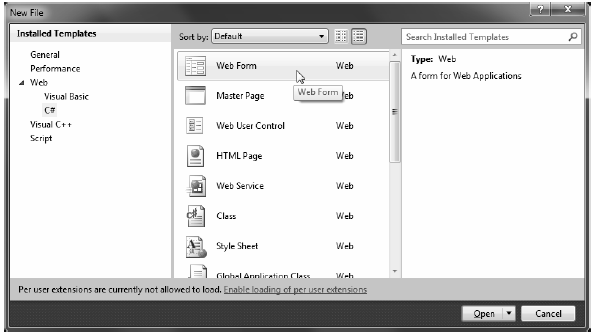
Figure 32-8 Creating a new single file ASP.NET page
Once you have done so, save this file as Default.aspx under a new directory on your hard drive that you can easily find later (for example, C:\MyCode\SinglePageModel).
Next, use Windows Explorer to create a subdirectory under the SinglePageModel folder named bin. The specially named bin subdirectory is a registered name with the ASP.NET runtime engine. Into the \bin folder of a website’s root, you are able to deploy any private assemblies used by the web application. For this example, place a copy of AutoLotDAL.dll (see Chapter 21) into the C:\MyCode\SinglePageModel\bin folder.
Note As shown later in this chapter, when you use Visual Studio 2010 to create a ASP.NET web project, the IDE will maintain the \bin folder on your behalf.
Now, using the Visual Studio 2010 Toolbox, select the Standard tab and drag and drop a Button, Label, and GridView control (the GridView widget can be found under the Data tab of the Toolbox) onto the page designer between the opening and closing form elements. Feel free to make use of the Properties window to set various visual properties settings as you choose. Also, be sure to give each web widget a proper name via the ID attribute. Figure 32-9 shows one possible design. (I kept the example’s look and feel intentionally bland to minimize the amount of control markup, but feel free to spruce things up to your liking.)
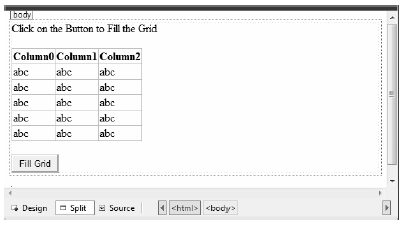
Figure 32-9 The Defau>t.aspx GUI
Now, locate the <form> section of your page. Notice how each web control has been defined using an <asp:> tag. After this tag prefix, you will find the name of an ASP.NET web control (Label, GridView and Button). Before the closing tag of a given element, you will find a series of name/value pairs that correspond to the settings you made in the Properties window, for example:
<form id="form1" runat="server">
<div>
    <asp:Label ID="lblInfo" runat="server"
        Text="Click on the Button to Fill the Grid">
    </asp:Label>
    <br />
    <br />
    <asp:GridView ID="carsGridView" runat="server">
    </asp:GridView>
    <br />
    <asp:Button ID="btnFillData" runat="server" Text="Fill Grid" />
</div>
</form>
You will dig into the full details of ASP.NET web controls later in Chapter 33. Until then, recall that web controls are objects processed on the web server that emit back their HTML representation into the outgoing HTTP response automatically. Beyond this major benefit, ASP.NET web controls mimic a desktop-like programming model in that the names of the properties, methods, and events typically echo a Windows Forms/WPF counterpart.
Handle the Click event for the Button type using either the Visual Studio Properties window (via the lightning bolt icon) or the drop-down boxes mounted at the top of the designer window (like you did for this chapter’s HTML review section). Once you do, you will find your Button’s definition has been updated with an OnClick attribute that is assigned to the name of the Click event handler you entered:
<asp:Button ID="btnFillData" runat="server"
    Text="Fill Grid" OnClick="btnFillData_Click"/>
Now, within the *.aspx server side <script> block author the Click event handler. Add the following code, noticing that the incoming parameters are a dead-on match for the target of the System.EventHandler delegate, which you have seen in many examples in this book:
<script runat="server">
    protected void btnFillData_Click(object sender, EventArgs args)
{
}
</script>
The next step is to populate the GridView using the functionality of your AutoLotDAL.dll assembly. To do so, you must use the <%@ Import %> directive to specify that you are using the AutoLotConnectedLayer namespace.
Note You will only need to use the <%@ Import %> directive if you are building a page with the single file code model. If you are using the default code file approach, you will simply use the using keyword of C# to include namespaces in your code file. The same is true for the <%@ Assembly %> directive, described next.
In addition, you need to inform the ASP.NET runtime that this single-file page is referencing the AutoLotDAL.dll assembly via the <%@ Assembly %> directive (more details on directives in just a moment). Here is the remaining relevant page logic of the Default.aspx file (modify your connection string as required):
<%@ Page Language="C#" %>
<%@ Import Namespace = "AutoLotConnectedLayer" %>
<%@ Assembly Name ="AutoLotDAL" %>

<!DOCTYPE html PUBLIC "-//W3C//DTD XHTML 1.0 Transitional//EN"
    "http://www.w3.org/TR/xhtml1/DTD/xhtml1-transitional.dtd">

<script runat="server">
    void btnFillData_Click(object sender, EventArgs args)
    {
        InventoryDAL dal = new InventoryDAL();
        dal.OpenConnection(@"Data Source=(local)\SQLEXPRESS;" +
            "Initial Catalog=AutoLot;Integrated Security=True");
        carsGridView.DataSource = dal.GetAllInventory();
        carsGridView.DataBind();
        dal.CloseConnection();
    }
</script>
<html xmlns="http://www.w3.org/1999/xhtml" >
...
</html>
Before you dive into the details behind the format of this *.aspx file, let’s try a test run. First, save your *.aspx file. Now, right click anywhere on the *.aspx designer and select the View in Browser menu option, which will launch the ASP .NET Development web server, which, in turn, hosts your page.
When the page is served, you will initially see your Label and Button controls. However, when you click your button control, a postback occurs to the web server, at which point the web controls render back their corresponding HTML tags. Figure 32-10 shows the output once you click the Fill Grid button.
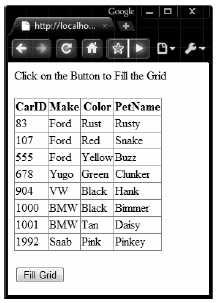
Figure 32-10 ASP.NET provides a declarative data binding model
Given, the current UI is quite bland. To spice up the current example, select the GridView control on the designer, and using the context menu (that tiny arrow on the upper left of the control), select the Auto Format option (Figure 32-11).
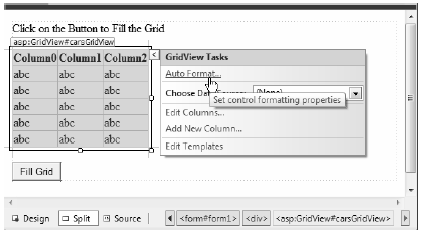
Figure 32-11 A richer GridView control!
From the resulting dialog box, pick a template that suits your fancy (I picked “Slate”). Once you click OK, view the generated control declaration, which is quite a bit richer than before:
<asp:GridView ID="carsGridView" runat="server" BackColor="White"
        BorderColor="#E7E7FF" BorderStyle="None" BorderWidth="1px" CellPadding="3"
        GridLines="Horizontal">
    <AlternatingRowStyle BackColor="#F7F7F7" />
    <FooterStyle BackColor="#B5C7DE" ForeColor="#4A3C8C" />
    <HeaderStyle BackColor="#4A3C8C" Font-Bold="True" ForeColor="#F7F7F7" />
    <PagerStyle BackColor="#E7E7FF" ForeColor="#4A3C8C" HorizontalAlign="Right" />
    <RowStyle BackColor="#E7E7FF" ForeColor="#4A3C8C" />
    <SelectedRowStyle BackColor="#738A9C" Font-Bold="True" ForeColor="#F7F7F7" />
    <SortedAscendingCellStyle BackColor="#F4F4FD" />
    <SortedAscendingHeaderStyle BackColor="#5A4C9D" />
    <SortedDescendingCellStyle BackColor="#D8D8F0" />
    <SortedDescendingHeaderStyle BackColor="#3E3277" />
</asp:GridView>
If you view your application again and click on your button, you will now see a more interesting UI (Figure 32-12), shown via Apple Safari on my Windows 7 install.
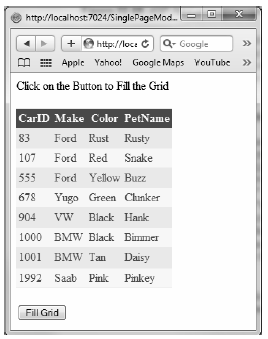
Figure 32-12 Your simple web page in Apple Safari
That was simple, yes? Of course, as they say, the devil is in the details, so let’s dig a bit deeper into the composition of this *.aspx file, beginning with examining the role of the <%@Page… %> directive. Do be aware that the topics you examine will apply directly to the more preferred code file model examined next.
A given *.aspx file will typically open with a set of directives. ASP.NET directives are always denoted with <%@ ... %> markers and may be qualified with various attributes to inform the ASP.NET runtime how to process the attribute in question.
Every *.aspx file must have at minimum a <%@Page%> directive that is used to define the managed language used within the page (via the language attribute). Also, the <%@Page%> directive may define the name of the related code-behind file (examined soon), and so on. Table 32-1 documents some of the more interesting <%@Page%>-centric attributes.
Table 32-1. Select Attributes of the <%@Page%> Directive
| Attribute | Meaning in Life |
|---|---|
| CodePage | Specifies the name of the related code-behind file |
| EnableTheming | Establishes whether the controls on the *.aspx page support ASP.NET themes |
| EnableViewState | Indicates whether view state is maintained across page requests (more details on this property in Chapter 33) |
| Inherits | Defines a class in the code-behind page the *.aspx file derives from, which can be any class derived from System.Web.UI.Page |
| MasterPageFile | Sets the master page used in conjunction with the current *.aspx page |
| Trace | Indicates whether tracing is enabled |
In addition to the <%@Page%> directive, a given *.aspx file may specify various <%@Import%> directives to explicitly state the namespaces required by the current page and <%@Assembly%> directives to specify the external code libraries used by the site (typically placed under the \bin folder of the website).
In this example, you specified you were making use of the types within the AutoLotConnectedLayer namespace within the AutoLotDAL.dll assembly. As you would guess, if you need to make use of additional .NET namespaces, you simply specify multiple <%@Import%>/<%@Assembly%> directives.
Given your current knowledge of .NET, you may wonder how this *.aspx file avoided specifying additional <%@Import%> directives to gain access to the System namespace in order to gain access to the System.Object and System.EventHandler types (among others). The reason is that all *.aspx pages automatically have access to a set of key namespaces that are defined within the web.config file under your installation path of the .NET platform. Within this XML-based file, you would find a number of autoimported namespaces, including the following:
<pages>
    <namespaces>
        <add namespace="System"/>
        <add namespace="System.Collections"/>
        <add namespace="System.Collections.Generic"/>
        <add namespace="System.Collections.Specialized"/>
        <add namespace="System.Configuration"/>
        <add namespace="System.Data.Entity.Design" />
        <add namespace="System.Data.Linq" />
        <add namespace="System.Linq" />
        <add namespace="System.Text"/>
        <add namespace="System.Text.RegularExpressions"/>
        <add namespace="System.Web"/>
        <add namespace="System.Web.Caching"/>
        <add namespace="System.Web.SessionState"/>
        <add namespace="System.Web.Security"/>
        <add namespace="System.Web.Profile"/>
        <add namespace="System.Web.UI"/>
        <add namespace="System.Web.UI.WebControls"/>
        <add namespace="System.Web.UI.WebControls.WebParts"/>
        <add namespace="System.Web.UI.HtmlControls"/>
...
    </namespaces>
</pages>
To be sure, ASP.NET does define a number of other directives that may appear in an *.aspx file above and beyond <%@Page%>, <%@Import%>, and <%@Assembly%>; however, I’ll reserve commenting on those for the time being. You’ll see examples of other directives as you progress through the remaining chapters.
Under the single-file page model, an *.aspx file may contain server-side scripting logic that executes on the web server. In this case, it is critical that all of your server-side code blocks are defined to execute at the server, using the runat="server" attribute. If the runat="server" attribute is not supplied, the runtime assumes you have authored a block of client-side script to be emitted into the outgoing HTTP response, and it will throw an exception. That being said, here is a proper server side <script> block:
Note All ASP.NET web controls will need to have the runat="server" attribute in their opening declaration. If not, they will not render their HTML into the outbound HTTP response.
<script runat="server">
    void btnFillData_Click(object sender, EventArgs args)
    {
        InventoryDAL dal = new InventoryDAL();
        dal.OpenConnection(@"Data Source=(local)\SQLEXPRESS;" +
        "Initial Catalog=AutoLot;Integrated Security=True");
        carsGridView.DataSource = dal.GetAllInventory();
        carsGridView.DataBind();
        dal.CloseConnection();
    }
</script>
The signature of this helper method should look strangely familiar. Recall that a given control event handler must match the pattern defined by a related .NET delegate. The delegate in question is System.EventHandler that can only call methods that take System.Object as the first parameter and System.EventArgs as the second.
The final point of interest in this first example is the declaration of the Button, Label, and GridView web controls. Like classic ASP and raw HTML, ASP.NET web widgets are scoped within <form> elements. This time, however, the opening <form> element is marked with the runat="server" attribute and is qualified with the asp: tag prefix. Any control which takes this prefix is a member of the ASP.NET control library and has a corresponding C# class representation in a given .NET namespace of the .NET base class libraries. Here you find:
<form id="form1" runat="server">
<div>
    <asp:Label ID="lblInfo" runat="server"
        Text="Click on the Button to Fill the Grid">
    </asp:Label>
    <br />
    <br />
    <asp:GridView ID="carsGridView" runat="server">
        ...
    </asp:GridView>
    <br />
    <asp:Button ID="btnFillData" runat="server" Text="Fill Grid" OnClick="btnFillData_Click"/>
</div>
</form>
The System.Web.UI.WebControls namespace of the System.Web.dll assembly contains a majority of the ASP.NET web controls. If you were to open the Visual Studio 2010 Object Browser, you could, for example, locate the Label control (Figure 32-13).
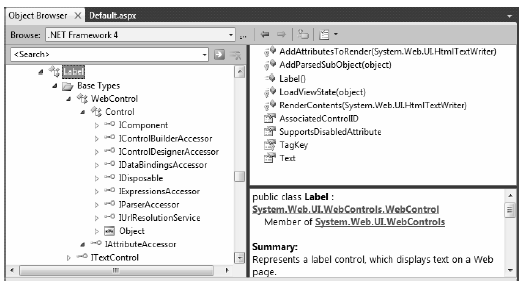
Figure 32-13 All ASP.NET control declarations map to a .NET class type
As you can see, an ASP.NET web control has an inheritance chain with System.Object at the very top. The WebControl parent class is a common base to all ASP.NET controls and defines all the common UI properties you would expect (BackColor, Height, etc.). The Control class is also very common within the framework; however, it defines more infrastructure-centric members (data binding, view state, etc) rather than a child’s graphical look and feel. You’ll learn more about these classes in Chapter 33.
If you are making use of the single-file page model, the HTML markup, server side <script> blocks, and web control definitions are dynamically compiled into a class type deriving from System.Web.UI.Page when the first request is made. The name of this class is based on the name of the *.aspx file and takes an _aspx suffix (e.g., a page named MyPage.aspx becomes a class named MyPage_aspx). Figure 32-14 illustrates the basic process.
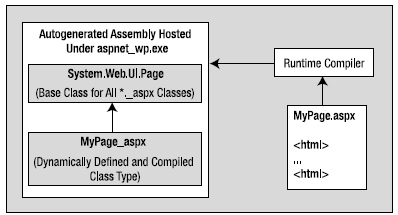
Figure 32-14 The compilation model for single-file pages
This dynamically compiled assembly is deployed to a runtime-defined subdirectory under the C:\Windows\Microsoft.NET\Framework\v4.0\Temporary ASP.NET Files root directory. The path beneath this root will differ based on a number of factors (hash codes, etc.), but if you are determined, eventually you will find the *.dll (and supporting files) in question. Figure 32-15 shows the generated assembly for the SinglePageModel example shown earlier in this chapter.
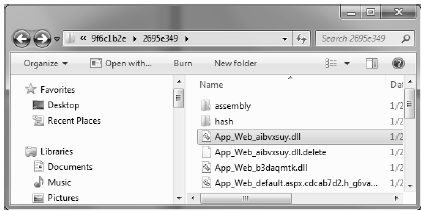
Figure 32-15 The ASP.NET autogenerated assembly
If you were to open this assembly into a tool such as ildasm.exe or reflector.exe, sure enough you will find a class extending Page, which each web control defined as a member of the class. Now, do be aware that you will typically never need to manually find, or in any way modify, these autogenerated assemblies. However, it is important to point out that if you change any aspect of your *.aspx file, it will be dynamically recompiled when a browser request the web page.